Tuesday, October 27, 2020

Welcome to Hiking Edziza

Congratulations on finding my Hiking Edziza blog. With information on this hike being scarce, it's too bad that the Google search engine doesn't recognize this as one of the better resources out there. Only the web-savvy and more thorough researchers make it here!

This is less of a blog and more of a photo essay documenting my 100 km backpacking trek across Mount Edziza Provincial Park, from Little Ball Lake to Buckley Lake, that was completed between August 26th and September 3rd, 2019. I did set up a blog in 2017/2018 to document my preparations leading up to this trip; including planning, equipment, finding hiking partners, and training hikes. My plan was to finish it all off with a complete trip report – thus providing readers with a valuable resource when planning their own trip. But my struggles with depression over the winter got the better of me and I ended up deleting the blog before I was able to add the trip report L.

Since reproducing the myriad of posts that I originally wrote is out of the question, readers will have to settle for what information I can work into my photo essay – but feel free to contact me if you have any specific questions.

Looking back, I feel that we were very lucky to get this hike in when we did. 2018 was plagued by a bad forest fire season in British Columbia with one of the biggest fires burning in the province resulting in the north end of the park being closed to access for much of the season. In 2020, corona virus is an issue and it would be doubtful that my three fellow adventurers traveling from Switzerland and Egypt would have been able to enter the country. 2019 also had its issues but we managed to squeak the trip in between a freak mid-August blizzard that dropped 60 cm (24+ inches) of snow on the park overnight (resulting in the few hikers in the park having to be rescued by helicopter), and some bad wind/rain squalls as the weather shifted to your typical autumn coastal dreariness.

In the end, this was the most spectacular and challenging trip I have ever been on. I could not have completed the trek without my hiking partners, Christoph, Alejandra, and Jeremy, who each contributed their own unique set of skills and even temperament to the trip. I could not have selected more enjoyable and competent people to go on an adventure with if I tried.

If you are coming on board as I construct my site, you will notice that I am posting the trip from end to beginning. This is being done on purpose so that once complete, the story can be followed from beginning to end as the reader scrolls through the posts.

Route Planning and Notes: Days 1-4

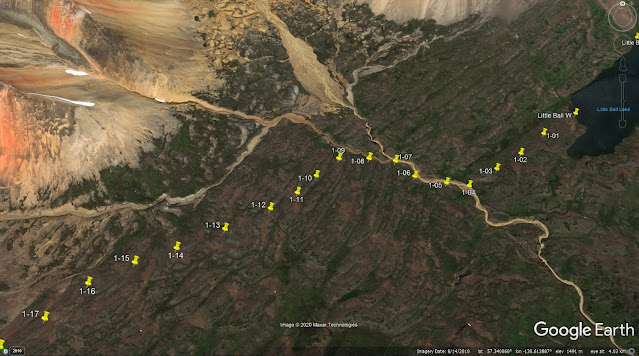
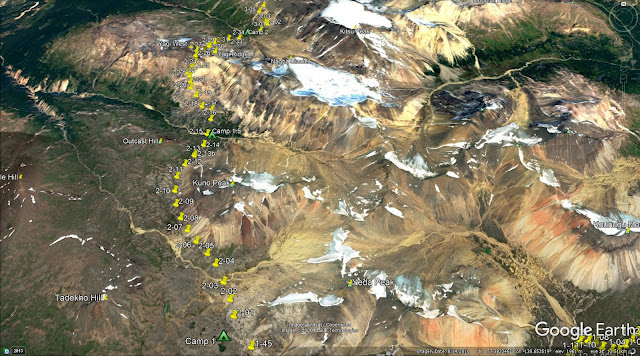
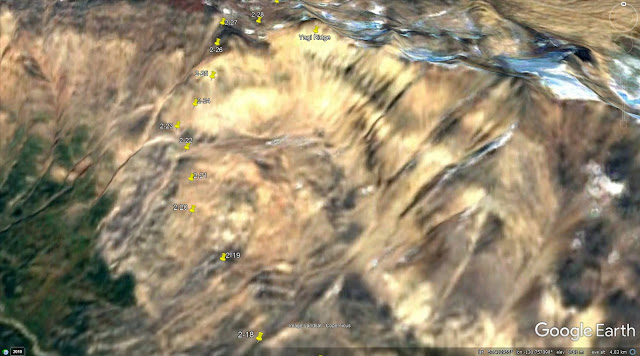
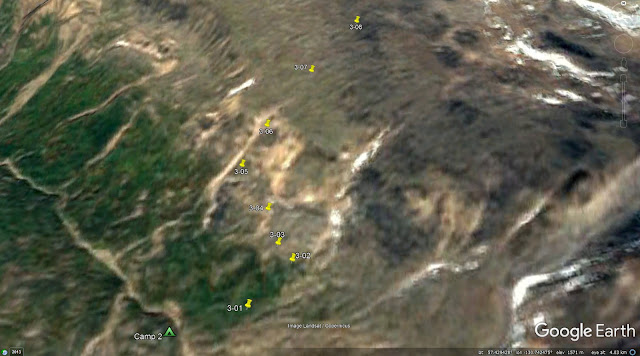
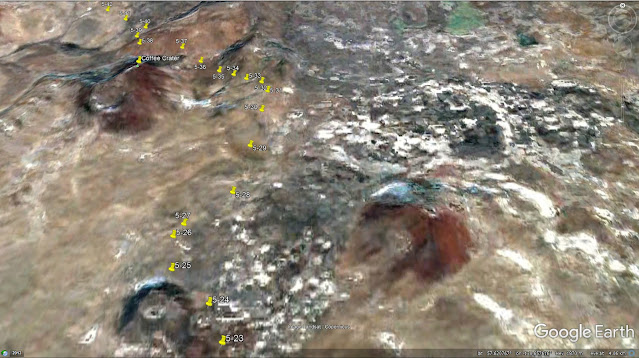
What follows in the next two posts is a "bread crumb" trail of the route we followed across Edziza, plotted out in Google Earth. The route for each day starts with an elevation graph and a general overview screen shot of the entire day's hike, followed by several zoomed in views and trip notes. You can click on each image if you want a bigger view.

The overall hiking plan is broken up so that each camp is near a good water source, and the distances between camps are short enough that there is time for some relaxation at the end of each day. The trip is designed to be completed in 8 days (which is what most people plan for) but if you had the time and extra food, there is lots of opportunity to explore and stretch the trip out even longer.

Here is a quick summary of the entire trip:
Note that the map reference numbers are from the topographic maps available through hesperus-wild.org. These are the best maps available for this trip.

Day

Maps

Segment

Distance (km)

Elevation +/- (m)

Elevation Min (m)

Elevation Max (m)

1

11A/B

Little Ball to Camp 1

12.1

+501, -379

1461

1815

2

11A/10A

Camp 1 to Camp 2

11.5

+754, -778

1423

2041

3

9A/9B

Camp 2 to Camp 3

12.0

+629, -778

1423

1983

4

8B/7B

Camp 3 to Camp 4

12.5

+1011, -780

1429

1951

5

7B/6B

Camp 4 to Camp 5

14.6

+710, -710

1652

1999

6

5A/5B

Camp 5 to Camp 6

14.6

+569, -549

1660

1835

7

5A/4B

Camp 6 to Camp 7

14.1

+186, -562

1304

1735

8

4B/3B

Camp 7 to Buckley

7.5

+32, -499

829

1304


Day 1:
Little Ball Lake to Camp 1
Total Distance: 12.1 km 
Elevations: Min = 1461 m, Avg. = 1609 m, Max. = 1815 m
Elevation Changes: +501 m, -379 m


Day 1 takes you from Little Ball Lake, along the southern edge of the Spectrum Range, through a low pass leading to Little Arctic Plateau, and then north to camp 1 near some small tarns. 


The float plane generally drops you off at the east end of Little Ball Lake. There is a good gravel beach here with water deep enough to get the floats right up to shore to drop off your gear without getting wet feet.


From the east end of Little Ball Lake we hiked along the north side up on the first bench to get to the other end of the lake. There are a few shrubby sections here but the passage is generally clear. At the west end of the lake we crossed a low area with a small stream to get to a slight ridge leading away from the lake (Little Ball W to 1-03). This trajectory takes you to a small flats section on Little Ball Creek (1-04) where the creek gradient and width makes it an easy boots-off crossing. 


From Little Ball Creek the route gradually drifts closer to the base of the mountains. As you follow along the faces of the mountains, you gradually gain some altitude - this makes for a better approach than staying in the valley below and having to make a steeper climb to gain the pass.


When you gain the notch at the pass it is best to cross to the south side and skirt over the shoulder of the ridge just above the pass (maybe 10-15 feet up). The path down the center of the pass is in a steep "V" and a jumble of larger rock that is somewhat unstable makes the north side and center a more difficult route. Once you have made it through the pass and down the slope for a bit, cross back to the north side of the gully and gradually make your way down to the plateau below.


Camp 1 is near two small tarns out on the plateau. It is quite rocky in this area but we found a spot where moss covered an area wide enough to set up several tents. If the wind is blowing, another option might be to find a sheltered area closer to the base of the mountain, although nothing really stood out when we were there. Camp 1 has some spectacular views in all directions.


Day 2:
Camp 1 to Camp 2
Total Distance: 11.5 km
Elevations: Min = 1423 m, Avg. = 1616 m, Max. = 2041 m
Elevation Changes: +754 m, -778 m


On day 2 you encounter the most challenging obstacle on the entire hike; Yagi Ridge. 


From camp 1 head north, aiming for the west face of Kuno Peak, Tadekho Hill and Exile Hill will be across the plateau on your left. There are no serious obstacles crossing the plateau - just lots of rocky sections.


The route takes you north along the west face of Kuno Peak where you eventually round the nose of Kuno peak and pass between it and Outcast Hill.


There is another boots-off creek crossing just before you reach Yagi Ridge. From the creek, ascend the low scree ridge fronting Yagi Ridge and head west.


Here is where I insert my disclaimer: I am not sure we took the best or safest route up Yagi Ridge. It looked good through the binoculars when we scouted it from below. We obviously made it to the top but the route we followed was steep and there was more exposure than we expected. In hindsight, and seeing what things looked like from the top, we might have been better off angling up the slope to the west before switching back to climb somewhat easterly to gain the summit. Use your own judgement here and stay within your abilities.


When you get to the top of the ridge (2-27), take some time to take in the views. The descent down the other side is a walk in the park compared to the climb - just follow the path of least resistance and descend to the northeast. Camp 2 is along Nagha Creek. There are good camping spots on both sides of the creek, but late in the day, the creek is often higher due to glacial melting. If it looks too high to safely cross, camp on the near side of the creek and do the crossing first thing the next morning.


Day 3:
Camp 2 to Camp 3
Total Distance: 12.0 km 
Elevations: Min = 1423 m, Avg. = 1747 m, Max. = 1983 m
Elevation Changes: +629 m, -778 m


Day 3 starts with a climb up and out of the valley and onto Kitsu Plateau. The route generally meanders across the plateau before descending into Raspberry Pass.


From camp 2 we crossed Nagha Creek and made our way up the slope about half way (3-02) before angling northwest to complete the climb along the edge of a drainage (3-05), The way up is not too steep. Once at the top (3-07) if you wanted a closer look at the Ash Pit it is a short 1.5 km along the rim of the plateau.


Kitsu Plateau is a wonderful wide open space and generally easy to navigate.


At one point we ended up heading towards a steep drainage (just north of 3-17) and had to deviate to the east to get around it.


Most hikers head straight north from 3-28 and drop straight down into the middle of Raspberry pass. This route is very steep and not recommended. We drifted east from 3-28 to a wide drainage that had a more gradual slope. About half way down, scattered trees and shrubs are encountered but finding a clear path is no too difficult. Camp 3 is in a grassy meadow along Bourgeaux Creek - this spot is about 1.5 km east of the high point in the pass.


Day 4:
Camp 3 to Camp 4
Total Distance: 12.5 km
Elevations: Min = 1429 m, Avg. = 1812 m, Max. = 1951 m
Elevation Changes: +1011 m, -780 m


Day 4 takes you from Raspberry pass to camp 4 along the north fork of Walkout Creek.


The day starts with a climb out of Raspberry pass, following a drainage up the north slope of the valley directly across from the camp site (4-01 to 4-07). Stick to the west side of the drainage. The way up is not too steep and picking your way through the trees on the lower slope is fairly easy.


Once you reach the top (4-07), it is a straight shot across a small plateau, aiming for the east side of Cache Hill. The overlook from Cache Hill is quite spectacular (4-12). From there, follow the ridge in a generally east/northeast direction towards Tadeda Peak, then veer more north across the rolling mounds (at 4-18).


The route takes you past the west side of Tadeda Peak. You will need to gain some altitude here to avoid a couple of steep drainages. We crossed both drainages high on the slope. The second drainage was badly eroded and steep but we managed to find a way through where the small creek was just starting to pick up momentum (4-33). Another option might be to just head north from 4-23 and cross the valley after the two drainages have merged - but it looked quite steep from our vantage and would require a long climb down and back up again.


Once you cross the second drainage the route angles up the slope into the upper end of the south fork of Walkout Creek. As you work your way into the drainage, stay high on the slope and bear north. Somewhere between 4-43 and 4-44 an outfitters trail starts to develop. This trail takes you up through a slight pass to the north (4-46)


Once through the slight pass you will be on a wide slope overlooking Chakima Pass at a right angle (4-47). If you look to the east you will catch a glimpse of Mowdade Lake. Make your way down the slope to the middle of the pass - there is a faint trail switch-backing down the slope but we found it hard to follow in places. When you hit the pass (4-51) you will see an outfitters trail that heads through the pass from Chakima Creek and leads down the north fork of Walkout Creek. Follow the trail west, then northwest until you reach the north fork of Walkout Creek (4-59). Camp 4 is anywhere along the creek.

Wednesday, October 21, 2020

Route Planning and Notes: Days 5-8

Here is the continuation of the actual route we followed on our trek across Edziza. As you review the route and notes, keep in mind that we started from camp 4 on day 6 (being a full day behind at that point). We also covered both the day 7 and day 8 sections of the route all on what was for us day 8 - the final day of our hike.

The route for each day starts with an overview of the route, an elevation map, and a Google Earth overview screen shot, followed by several more zoomed in views. I have tried to provide notes after each section where needed. Even though we were off schedule on our actual hike, I have broken things up here as though we were on schedule. Click on the pictures if you want to get a larger view.

Day 5
Camp 4 to Camp 5
Total Distance: 14.8 km
Elevations: Min = 1652 m, Avg. = 1862 m, Max. = 1999 m
Elevation Changes: +710 m, -710 m

Day 5 starts from camp 4 at the headwaters of the north fork of Walkout Creek, climbs up onto Big Raven Plateau, and winds through the south west volcanic complex to camp 5 at the headwaters of Sezill Creek.


I can't tell you what it is like to actually camp at camp 4 because we didn't actually stay there. From what we saw on the way past, it looked like there were several good spots to camp near the creek and the views up and down the valley were quite spectacular.


The outfitters trail that we picked up yesterday in the pass leading to Chakima Creek continues from the vicinity of camp 4 up a narrow gully leading onto Big Raven Plateau. The trail follows up the right hand side of the gully and then switch backs up the opposite side about two thirds of the way up (at 5-09). Once you reach the top of the gully, the trail fades away.


Once we hit the top of the gully we aimed for a low saddle on the ridge directly in front of us (5-16), see photo in the trip report). It was a gradual climb to the top. Another option would have been to skirt to the west of the ridge and pass between the ridge and Keda Cone. But I would favor our route over the ridge as the panoramic view of the volcanic complex from the top was quite spectacular.

From the top of the ridge we descended in a north easterly direction and followed Taweh Creek upstream until we spotted some cairns indicating the safest place to cross the lava flows (5-21). Note that the creek is the last water source for the next 10 km so make sure you fill up here. The cairns do not form a continuous chain of markers through the volcanic complex but a faint trail (really just a worn path in the loose rock and ash) develops here which becomes more well worn as you proceed.


By the time you round the unnamed volcanic cone on the other side of the lava flow (5-25) the trail is quite distinct and easy to follow. The trail heads north and hooks around the east and north sides of Coffee Crater as it crosses the dry lake bed (5-35 and 5-36) and ascends through a low gap between the crater and a ridge to the north (5-37). The trail in this section is mostly on a mix of pumice, fine-grained obsidian, and volcanic ash - very abrasive on the boots.


Once you pass Coffee Crater you enter a section dominated by gray sand-like volcanic ash. The trail continues to be easy to follow as it heads north west over and around piles of ash. 

As you approach Cocoa Crater (passing to the east of it) you will be heading up a drainage that drains off the west side of Tencho Glacier. Here (points 5-47 to 5-52) you need to use caution and choose your route carefully - part of the glacier is overlaid with ash and it is hard to tell if you are on terra-firma or on the glacier. There were several exposed crevasses with steep loose material surrounding them. The trail ended up crossing over a hanging ice bridge - we didn't realize it till after we crossed. Watch where the worn path is heading and be prepared to alter your course as needed.


Once you reach the top of the drainage (5-54, north east of Cocoa Crater) the trail heads north west and then west to round the nose of Koosick Bluff. As you pass to the west of the bluff, the trail fades away and views of the headwaters of Sezill Creek open up. Here you are up on a rise overlooking the upper valley (5-51). Camp 5 for the night is anywhere along the creek.

Day 6:
Camp 5 to Camp 6 
Total Distance: 14.6 km 
Elevations: Min = 1660 m, Avg. = 1773 m, Max. = 1835 m
Elevation Changes: +569 m, -549 m


Day 6 takes you from camp 5 at the head of Sezill Creek, along the west face of Mount Edziza, and through a low pass east of Tsekone Ridge to Camp 6 south of Eve Cone.


From camp 5 start by angling higher up the drainage of Sezill Creek to avoid crossing some of the deeper valleys. When you can see the nose of Ornostay Bluff, skirt around the nose to the west.


Navigation on the plateau is about as straight forward as it can get - just wander north anywhere on the plateau you care to go. We tended to stay close to the glacial moraine fronting Edziza. Any creek crossings on this stretch were a simple step across or rock-hop.


Just before Tsekone Ridge there is a nice waterfall on one of the larger creeks (east of 5-42). At this point, if you are close to the falls, ascend to the low pass between Edziza and Tsekone Ridge (6-46). 

Another option, if you are farther out on the plateau, is to skirt around the west side of the Tsekone Ridge and camp near the headwaters of Elwyn Creek and overlooking the valley bellow. This was our original plan but we opted to cut the corner instead to save some time.


From the low pass, bear slightly east of north towards Eve Cone (you can't miss it). Camp 6 is near where two glacial creeks, that drain off the north face of Edziza, come together (6-54). These were boots-off crossings for me but Christoph, with his long legs, found spots where he could rock-hop. 

We opted to camp up on the plateau just north of where the creeks joined to avoid any surprises from the grizzly bear that was wandering the area. The added bonus is that the views from camp were spectacular in all directions. If you need to avoid any winds, camping down by the creek is an option. 

Both creeks were quite murky but we found a small side channel that ran underground for a bit before bubbling back to the surface. Being mostly filtered through the sand, it was an acceptable place to filter drinking water.

Day 7:
Camp 6 to Camp 7 (with climb up Eve Cone)
Total Distance: 14.1 km 
Elevations: Min = 1304 m, Avg. = 1516 m, Max. = 1735 m
Elevation Changes: +186 m, -562 m


Day 7 goes from camp 6 to Eve cone, then follows the trail that develops near Eve Cone to Willie William's (outfitters) camp just below tree-line.


It is possible to push all the way to Buckley Lake from camp 6 in one long day (~22 km, including the side trip up Eve Cone). This is what we ended up doing to avoid a nasty shift in the weather. Had we not done this, it would have been an easy 2 days to Buckley Lake with lots of time to linger at Eve Cone and an early afternoon pickup at Buckley.

Note that the exact locations of Oasis camp and the outfitter's camp on the map may not be accurate. I had planned to re-position those waypoints when we passed by the camps, but I neglected to do so.


From camp 6 head straight for Eve Cone. If you plan to climb the cone, skirt around the base to the north side and follow the worn path to the top (to avoid creating any new scars on the slopes). 


Right at Eve Cone, a trail materializes along the edge of the lava flows (7-09). It essentially follows the edge of the lava flows around the east side of Sidas Cone


As I mentioned, I am not sure the Oasis camp location is accurate on my map. When following the trail you eventually come over a rise and drop into a small gully where a stream bubbles out of the ground. Oasis is often used as a camp location for people making the hike from Buckley Lake. Tenting spots are a little tight here but the water source and distance from Buckley Lake makes it an attractive stopping point when hiking the reverse direction.


There are two outfitters camps to choose from for camp 7, one near treeline and one a little below treeline - not sure which one was Willie William's camp. Both are right on the trail so you can't miss them. Water sources are nearby but they are a little swampy with lots of horse dung around them. Both camps are well used but offer the possibility of a camp fire.

Day 8:
Camp 7 to Buckley Lake 
Total Distance: 7.54 km 
Elevations: Min = 829 m, Avg. = 1043 m, Max. = 1304 m
Elevation Changes: +32 m, -499 m


Day 8 simply follows the forested outfitters trail all the way to Buckley Lake. The trail is in decent shape if not a little rough and wet in places. It's down hill all the way so not too strenuous of a hike. 


As you near the lake, there is a short boardwalk section that crosses a swampy area. Some of the boards are rotten or missing but the swampy section was dry when we were there so it wasn't a problem. A log bridge crosses Buckley Creek about 1 km from the Buckley Lake camp.

Buckley lake camp is well used and I found it quite messy. We didn't need to spend the night there but there are plenty of places to pitch a tent. There is also a bear proof food locker near the east end of the camp and a couple of fire pits. 

Thursday, October 8, 2020

Day 1

Day 1 would see us fly into Little Ball Lake, hike along the south edge of the Spectrum Range, through a low pass leading to Little Arctic Plateau, and then head north to a series of small tarns just southwest of Kuno Peak (12.1 km, +501 m, -379 m)


The Alpine Lakes Air float plane base at Tatogga Lake.


We met up with the pilot the previous evening to see when we might be flying in. The weather had been very wet and unsettled over the previous several days, and that evening was no exception. The forecast for the next day was for more of the same, with conditions getting worse later in the day, so the pilot advised us to be at the dock by 8:00 am in hopes of an early start before conditions deteriorated. 

The next morning the cloud deck was not too bad looking to the north west towards Buckley Lake, but to the south west, the way into Little Ball Lake, the clouds hung low over the mountains. There was another group flying into Buckley so the pilot decided to fly them in first and then see what developed as the day progressed. At this point, it was not looking good for us.


Looking north west along the flight-path to Buckley Lake. The high cloud deck and a lower elevation meant that it was a go for the Buckley lake group.


Looking south west from Tatogga Lake with low hanging clouds blocking the route into Little Ball Lake.


The float plane returning from Buckley Lake.


Around 11:00 the clouds seemed to be lifting enough to make the attempt to get into Little Ball Lake. The pilot figured we had an 80% chance at making it in, so we loaded up and crossed our fingers.


The fellowship of Edziza: Christoph, Alejandra, Myself, and Jeremy.


We didn't take many photos on the flight in because there wan't much to see - just brief glimpses of the mountains as we worked our way around the ever-shifting cloud banks. At the halfway point to the lake, the pilot commented that our chances had gone down to about 50%. 

About 2 km from the lake all we could see was a solid bank of cloud in the direction we needed to go. The pilot was about to abort the approach but at the last second he spotted an opening to the south. He looped around and as he banked in from the south, there was the lake with a perfectly clear approach. 

As we taxied to the gravel beach at the east end of the lake the pilot was coaching us on getting our gear out quickly and staying out from behind the plane as soon as we had it all unloaded. He needed to get back in the air as soon as possible before the clouds closed back in and stranded him at the lake. As soon as we cleared our gear, he was full throttle right off the beach. A few minute later, all was quiet - the adventure had officially begun.


The east end of Little Ball Lake  just minutes after the float plane departed, with rain already starting to fall.


Halfway down Little Ball Lake looking east to were we started.


The iconic Kounugu Mountain just north of Little Ball Lake fully obscured by low-hanging clouds.

The wet, windy, dreary weather meant the usually bright colors of the Spectrum Range were muted - giving everything a watercolor like appearance.


Patches of lichens added to the colorful scenery.


Navigating through the patches of low shrubs around the lake was relatively easy.


More foul weather to the west - our route through the low pass is around the shoulder of the mountain just right of center.


The veil slowly lifting on Kounugu Mountain.


Even with the wet weather and low hanging cloud, the scenery was still impressive in all directions.


Pockets of color could be found everywhere.


Despite the rain and the recent blizzard that dumped over 60 centimetres of snow on the park, Little Ball Creek was running  relatively low and clear.


Our first boots-off creek crossing at a more open and shallow part of Little Ball Creek. I think this was the most we saw of Kounugu Mountain.


Cold and wet on the outside, but still enjoying the day.


Water color views with rain dappling the pond.


The Spectrum Range at its best.

I should mention here that none of the photos on this blog have been enhanced, and appear just as they were taken. The colors you see are exactly as they look when you are there. It truly is a spectacular place to be.


Lots of snow higher up on the slopes was a constant reminder of the blizzard that swept through Edziza the week before.


Wolf tracks were common and I was hoping for a sighting, even at a distance, but they proved to be elusive.


Green sandstone - just a small patch, and only seen in this one location.

On the approach to the pass.

Looking west to the low pass leading to Little Arctic Plateau.


The final approach to the pass with the weather starting to go from bad to worse.


This was the last picture I took on day 1. As we cleared the pass we were hit with strong winds and driving rain. We slogged it out for the last six kilometers to a series of small tarns just east of Tadekho Hill. Out on the plateau there was little shelter from the wind. It was all we could do to get the tents set up while keeping things dry, have a cold dinner, and climb into bed. I somehow managed to get a good nights sleep despite the driving wind and rain pelting the tent. Even with the challenging conditions, it felt good to have day one under our belts - we were all warm and dry in our tents and looking forward to tomorrow.