What follows in the next two posts is a "bread crumb" trail of the route we followed across Edziza, plotted out in Google Earth. The route for each day starts with an elevation graph and a general overview screen shot of the entire day's hike, followed by several zoomed in views and trip notes. You can click on each image if you want a bigger view.
The overall hiking plan is broken up so that each camp is near a good water source, and the distances between camps are short enough that there is time for some relaxation at the end of each day. The trip is designed to be completed in 8 days (which is what most people plan for) but if you had the time and extra food, there is lots of opportunity to explore and stretch the trip out even longer.
Here is a quick summary of the entire trip:
Note that the map reference numbers are from the topographic maps available through hesperus-wild.org. These are the best maps available for this trip.
|
Day
|
Maps
|
Segment
|
Distance (km)
|
Elevation
+/- (m)
|
Elevation
Min (m)
|
Elevation
Max (m)
|
|
1
|
11A/B
|
Little Ball to Camp 1
|
12.1
|
+501,
-379
|
1461
|
1815
|
|
2
|
11A/10A
|
Camp 1 to Camp 2
|
11.5
|
+754,
-778
|
1423
|
2041
|
|
3
|
9A/9B
|
Camp 2 to Camp 3
|
12.0
|
+629,
-778
|
1423
|
1983
|
|
4
|
8B/7B
|
Camp 3 to Camp 4
|
12.5
|
+1011,
-780
|
1429
|
1951
|
|
5
|
7B/6B
|
Camp 4 to Camp 5
|
14.6
|
+710,
-710
|
1652
|
1999
|
|
6
|
5A/5B
|
Camp 5 to Camp 6
|
14.6
|
+569,
-549
|
1660
|
1835
|
|
7
|
5A/4B
|
Camp 6 to Camp 7
|
14.1
|
+186,
-562
|
1304
|
1735
|
|
8
|
4B/3B
|
Camp 7 to Buckley
|
7.5
|
+32,
-499
|
829
|
1304
|
Day 1:
Little Ball Lake to Camp 1
Total Distance: 12.1 km
Elevations: Min = 1461 m, Avg. = 1609 m, Max. = 1815 m
Elevation Changes: +501 m, -379 m
Day 1 takes you from Little Ball Lake, along the southern edge of the Spectrum Range, through a low pass leading to Little Arctic Plateau, and then north to camp 1 near some small tarns.
The float plane generally drops you off at the east end of Little Ball Lake. There is a good gravel beach here with water deep enough to get the floats right up to shore to drop off your gear without getting wet feet.
From the east end of Little Ball Lake we hiked along the north side up on the first bench to get to the other end of the lake. There are a few shrubby sections here but the passage is generally clear. At the west end of the lake we crossed a low area with a small stream to get to a slight ridge leading away from the lake (Little Ball W to 1-03). This trajectory takes you to a small flats section on Little Ball Creek (1-04) where the creek gradient and width makes it an easy boots-off crossing.
From Little Ball Creek the route gradually drifts closer to the base of the mountains. As you follow along the faces of the mountains, you gradually gain some altitude - this makes for a better approach than staying in the valley below and having to make a steeper climb to gain the pass.
When you gain the notch at the pass it is best to cross to the south side and skirt over the shoulder of the ridge just above the pass (maybe 10-15 feet up). The path down the center of the pass is in a steep "V" and a jumble of larger rock that is somewhat unstable makes the north side and center a more difficult route. Once you have made it through the pass and down the slope for a bit, cross back to the north side of the gully and gradually make your way down to the plateau below.
Camp 1 is near two small tarns out on the plateau. It is quite rocky in this area but we found a spot where moss covered an area wide enough to set up several tents. If the wind is blowing, another option might be to find a sheltered area closer to the base of the mountain, although nothing really stood out when we were there. Camp 1 has some spectacular views in all directions.
Day 2:
Camp 1 to Camp 2
Total Distance: 11.5 km
Elevations: Min = 1423 m, Avg. = 1616 m, Max. = 2041 m
Elevation Changes: +754 m, -778 m
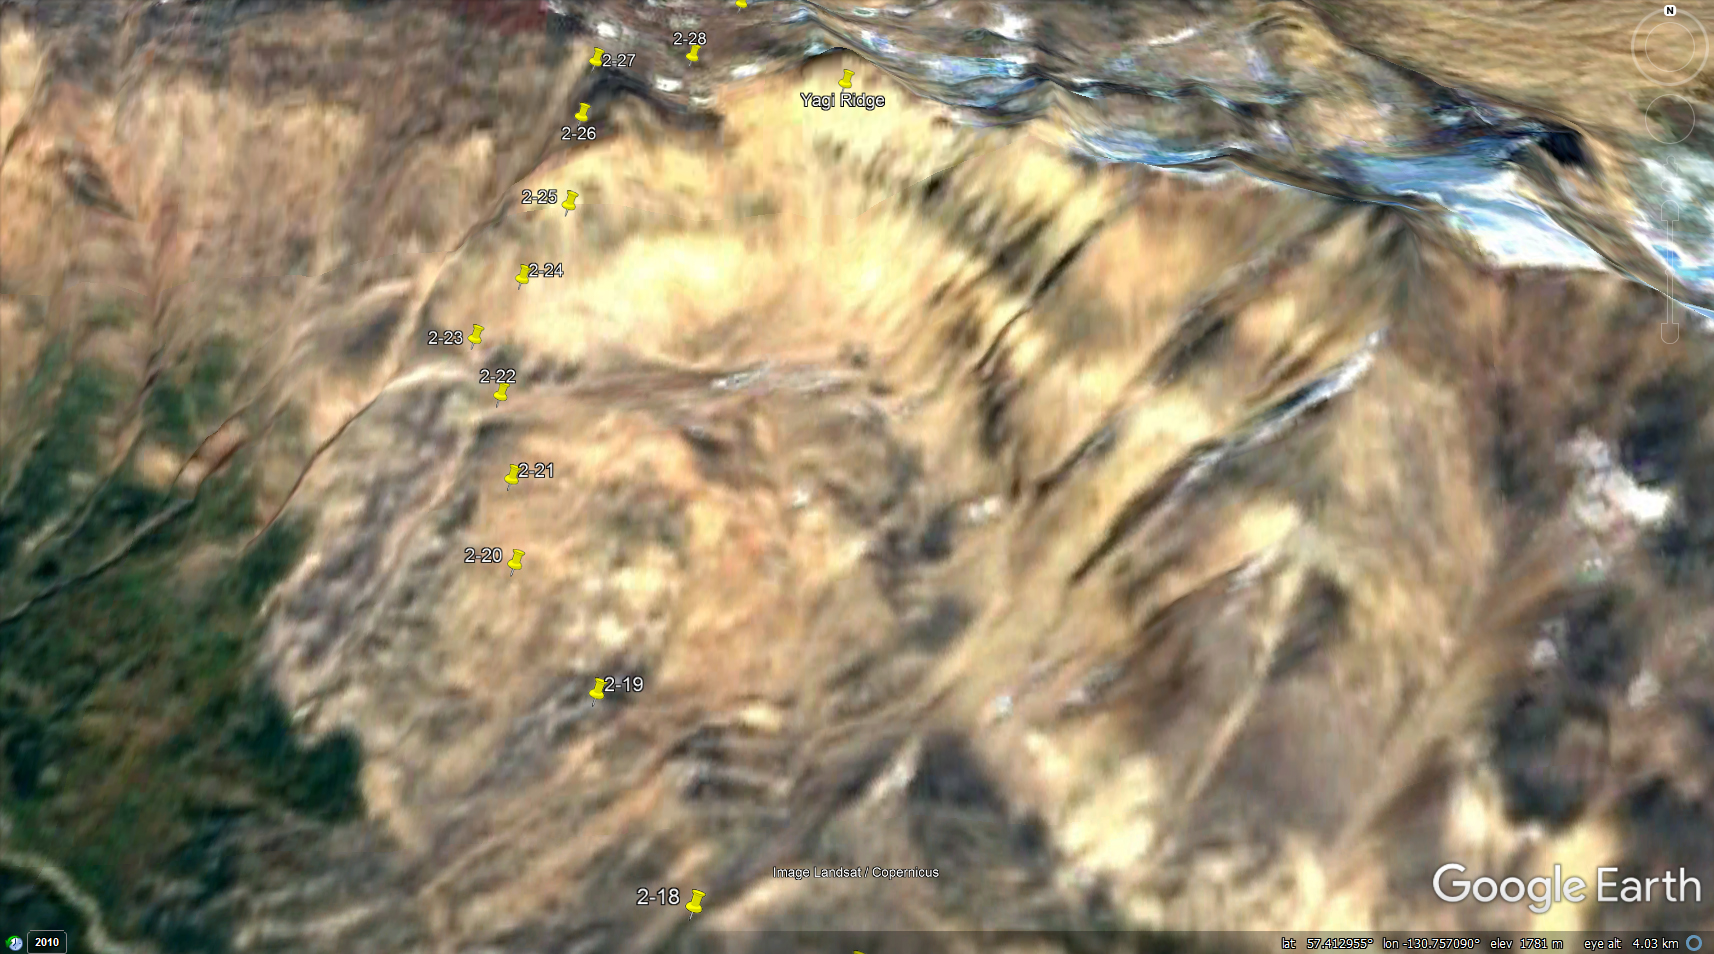
On day 2 you encounter the most challenging obstacle on the entire hike; Yagi Ridge.
From camp 1 head north, aiming for the west face of Kuno Peak, Tadekho Hill and Exile Hill will be across the plateau on your left. There are no serious obstacles crossing the plateau - just lots of rocky sections.
The route takes you north along the west face of Kuno Peak where you eventually round the nose of Kuno peak and pass between it and Outcast Hill.
There is another boots-off creek crossing just before you reach Yagi Ridge. From the creek, ascend the low scree ridge fronting Yagi Ridge and head west.
Here is where I insert my disclaimer: I am not sure we took the best or safest route up Yagi Ridge. It looked good through the binoculars when we scouted it from below. We obviously made it to the top but the route we followed was steep and there was more exposure than we expected. In hindsight, and seeing what things looked like from the top, we might have been better off angling up the slope to the west before switching back to climb somewhat easterly to gain the summit. Use your own judgement here and stay within your abilities.

When you get to the top of the ridge (2-27), take some time to take in the views. The descent down the other side is a walk in the park compared to the climb - just follow the path of least resistance and descend to the northeast. Camp 2 is along Nagha Creek. There are good camping spots on both sides of the creek, but late in the day, the creek is often higher due to glacial melting. If it looks too high to safely cross, camp on the near side of the creek and do the crossing first thing the next morning.
Day 3:
Camp 2 to Camp 3
Total Distance: 12.0 km
Elevations: Min = 1423 m, Avg. = 1747 m, Max. = 1983 m
Elevation Changes: +629 m, -778 m
Day 3 starts with a climb up and out of the valley and onto Kitsu Plateau. The route generally meanders across the plateau before descending into Raspberry Pass.
From camp 2 we crossed Nagha Creek and made our way up the slope about half way (3-02) before angling northwest to complete the climb along the edge of a drainage (3-05), The way up is not too steep. Once at the top (3-07) if you wanted a closer look at the Ash Pit it is a short 1.5 km along the rim of the plateau.
Kitsu Plateau is a wonderful wide open space and generally easy to navigate.
At one point we ended up heading towards a steep drainage (just north of 3-17) and had to deviate to the east to get around it.
Most hikers head straight north from 3-28 and drop straight down into the middle of Raspberry pass. This route is very steep and not recommended. We drifted east from 3-28 to a wide drainage that had a more gradual slope. About half way down, scattered trees and shrubs are encountered but finding a clear path is no too difficult. Camp 3 is in a grassy meadow along Bourgeaux Creek - this spot is about 1.5 km east of the high point in the pass.
Day 4:
Camp 3 to Camp 4
Total Distance: 12.5 km
Elevations: Min = 1429 m, Avg. = 1812 m, Max. = 1951 m
Elevation Changes: +1011 m, -780 m
Day 4 takes you from Raspberry pass to camp 4 along the north fork of Walkout Creek.
The day starts with a climb out of Raspberry pass, following a drainage up the north slope of the valley directly across from the camp site (4-01 to 4-07). Stick to the west side of the drainage. The way up is not too steep and picking your way through the trees on the lower slope is fairly easy.
Once you reach the top (4-07), it is a straight shot across a small plateau, aiming for the east side of Cache Hill. The overlook from Cache Hill is quite spectacular (4-12). From there, follow the ridge in a generally east/northeast direction towards Tadeda Peak, then veer more north across the rolling mounds (at 4-18).
The route takes you past the west side of Tadeda Peak. You will need to gain some altitude here to avoid a couple of steep drainages. We crossed both drainages high on the slope. The second drainage was badly eroded and steep but we managed to find a way through where the small creek was just starting to pick up momentum (4-33). Another option might be to just head north from 4-23 and cross the valley after the two drainages have merged - but it looked quite steep from our vantage and would require a long climb down and back up again.
Once you cross the second drainage the route angles up the slope into the upper end of the south fork of Walkout Creek. As you work your way into the drainage, stay high on the slope and bear north. Somewhere between 4-43 and 4-44 an outfitters trail starts to develop. This trail takes you up through a slight pass to the north (4-46)
Once through the slight pass you will be on a wide slope overlooking Chakima Pass at a right angle (4-47). If you look to the east you will catch a glimpse of Mowdade Lake. Make your way down the slope to the middle of the pass - there is a faint trail switch-backing down the slope but we found it hard to follow in places. When you hit the pass (4-51) you will see an outfitters trail that heads through the pass from Chakima Creek and leads down the north fork of Walkout Creek. Follow the trail west, then northwest until you reach the north fork of Walkout Creek (4-59). Camp 4 is anywhere along the creek.


No comments:
Post a Comment
Note: Only a member of this blog may post a comment.